This action will set the thermostat to occupied or unoccupied settings based on triggered events from the event provider’s scheduled events. This action will also automatically turn off schedules for occupied mode in the thermostat since any schedules will conflict with commands being sent via Events2HVAC. You may optionally re-enable schedule during unoccupied mode or keep them off.
This action applies to the following event triggers:
•EventStartStop
•EventSetupTeardown
•ZoneFirstLastEventStartStop
•ZoneFirstLastSetupTeardown
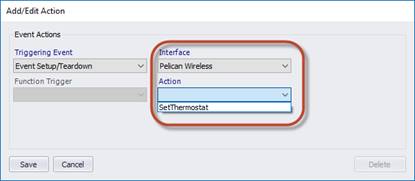
After adding a new action in equipment manager, select one of the triggering events, along with the “Pelican Wireless” interface, followed by the “SetThermostat” action.
Note: Only the event triggers shown can be used for SetThermostat action. The action won’t be available if other event triggers are selected here.
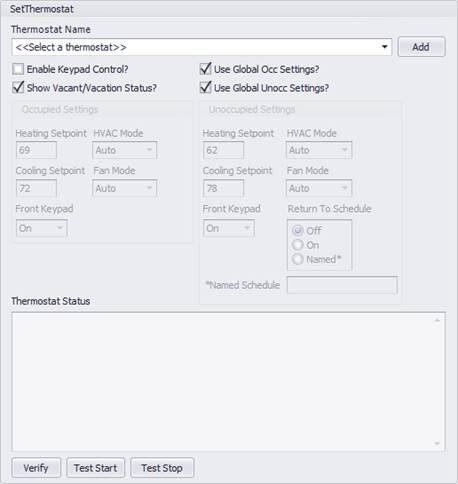
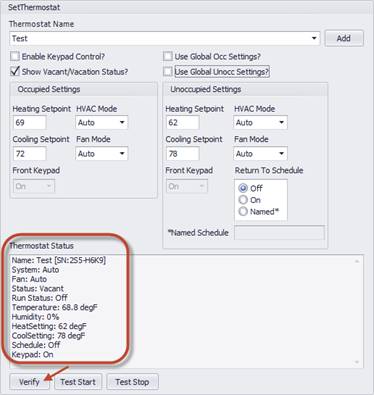
Action Settings
The dialog below is shown with default settings applied. You can choose to use global settings from the default settings configured earlier or individually set the setpoints for each thermostat.
|
Field Name |
Description |
Range |
|
Thermostat Name |
Select the name of the thermostat that you want to control from the drop-down list. |
The drop-down list will show all the thermostats that you have discovered in the initial setup. |
|
Enable Keypad Control? |
Check this to send commands to the front keypad for each state. Unchecking this will leave the keypad in the last commanded state. |
Note: if you select “Use Global…” settings, you must enable this to allow those settings to be commanded. |
|
Show Vacant/Vacation Status? |
If this is checked, when unoccupied mode is commanded to the thermostat, the status will be set to “Vacant”. This will show on the thermostat display as “Vacant” and in the Management Site as “Vacation”. If unchecked, status will remain “Occupied” unless the site is in vacation mode. |
Default = Checked Note: The Site Manager vacation mode and default vacation schedules in the thermostat may affect the thermostats during switchover to “Vacant” mode by E2H. If there is a residing vacation schedule in the thermostat at the time of switchover to “Vacant” from “Occupied”, the vacation schedules will take over not the E2H unoccupied setpoints. |
|
Use Global Occ Settings |
Check to use the default settings for occupied mode found in the Pelican Wireless Options. Uncheck to individually set the settings. |
|
|
Use Global Unocc Settings |
Check to use the default settings for unoccupied mode found in the Pelican Wireless Options. Uncheck to individually set the settings. |
|
|
Occupied Heating Setpoint |
Set the heating setpoint during occupied mode. |
Range is determined by the thermostat min/max range. |
|
Occupied Cooling Setpoint |
Set the cooling setpoint during occupied mode. |
Range is determined by the thermostat min/max range. |
|
Occupied HVAC Mode |
Set the mode status during the occupied mode. |
Auto, Off, Cool, Heat |
|
Occupied Fan Mode |
Set the fan mode status during occupied mode. |
Auto, On |
|
Occupied Front Keypad |
If keypad control is enabled, this value will set the front keypad off or on during occupied mode. |
Off (locked), On |
|
Unoccupied Heating Setpoint |
Set the heating setpoint during unoccupied mode. |
Range is determined by the thermostat min/max range. |
|
Unoccupied Cooling Setpoint |
Set the cooling setpoint during unoccupied mode. |
Range is determined by the thermostat min/max range. |
|
Unoccupied HVAC Mode |
Set the mode status during the unoccupied mode. |
Auto, Off, Cool, Heat |
|
Unoccupied Fan Mode |
Set the fan mode status during unoccupied mode. |
Auto, On |
|
Unoccupied Front Keypad |
If keypad control is enabled, this value will set the front keypad off or on during unoccupied mode. |
Off (locked), On |
|
Return to Schedule |
Select what action you want to take for the thermostat schedule setting when the event is over. |
Off=Schedules Off (Default), |
|
Named Schedule |
Enter the name of a shared schedule to run when Return to Schedule = Named. |
(Case sensitive) |
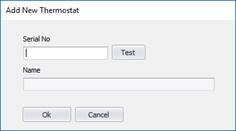
Add Button
To add a new thermostat that is not in the drop-down list, click the “Add” button. This will allow you to enter the serial number of a single thermostat. To add in groups of thermostats, see the Thermostats tab in the Interface options.
After entering the serial number, select “Test” to verify that the thermostat can be read. If the thermostat is found, the name of the thermostat will be shown with a green background as shown below.
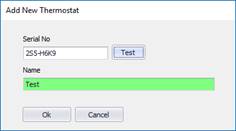
Selecting OK will merge this thermostat with the list of all thermostats found for the site.
Verify Button
To verify the thermostat can be read over the network, click on the verify button. You will see some information coming back from the thermostat if the thermostat can be read. This will show the status and setpoints of the thermostat.
Test Start Button
Click the “Test Start” button to test sending a command when an event start (occupied mode) is triggered. You will see the status of the thermostat after the command is sent.
Test Stop Button
Click the “Test Stop” button to test sending a command when an event stop (unoccupied mode) is triggered. You will see the status of the thermostat after the command is sent.